This blog post is the first of a blog series about speed up your machine learning prototyping. In part 1 (this part) I will talk about how to structure machine learning projects and the workflow for faster development. In part 2 I explain how to further increase the development speed with a toolbox we developed. In this post, I focus on computer vision tasks with datasets containing images as data and image annotations (bounding box, etc), but the concept is adaptable to other fields as well (NLP, tabular data, etc.).
About me
My name is Sebastian Rettig and I develop machine learning / deep learning prototypes at the AI Technology R&D Division for over 4 years now. Currently I focus on development speedup through (semi-) automation, tooling and workflow optimization.
The prototyping workflow
The workflow for machine learning projects can be broadly divided into 4 tasks arranged in a loop. The following paragraphs explains each task and corresponding steps.
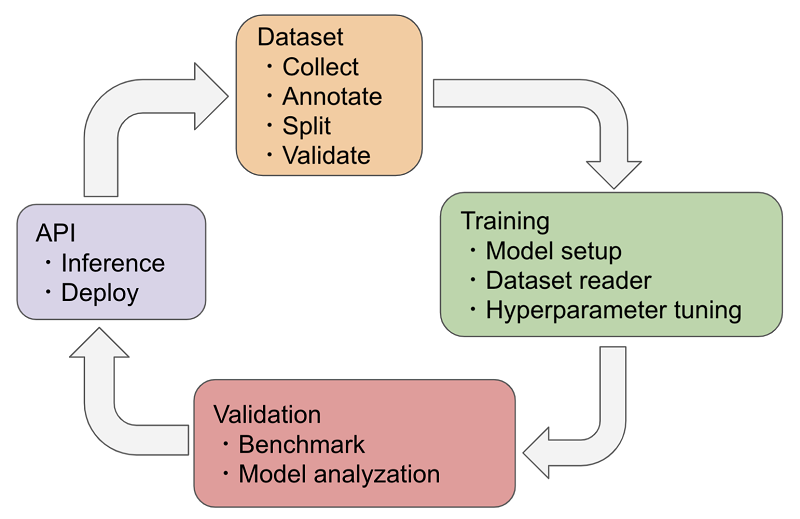
1. Dataset
Create a dataset contains four main steps. First collect the data (e.g. images or tabular data) from a database, from the internet or download an existing dataset (e.g. Image-Net, COCO, PascalVOC). Second you split your data into a training set, validation set and test set. Third if not already annotated, annotate the training set and validation set by using an annotation tool, e.g. VGG Image Annotator (VIA)or VoTT (Visual Object Tagging Tool). Finally you should validate your dataset before start training to ensure that the annotations are correct as well as the training, validation and test set do not intersect, otherwise the training and benchmark results do not reflect the correct training state.
2. Training
In the training task the first step is to setup the model which includes model selection and / or modification. The second step is to connect the dataset with the model by implementing a dataset reader. The last step is to fine tune hyper parameters (batch size, learning rate, training epochs, loss function, regularization, etc.) and start the training.
3. Validation
Implement a benchmark which use the test set in the dataset. The data is fed into the trained model for inference and the results can be stored in a report file, printed in terminal or visualized in a webpage. Additionally implement analyzation tools like heatmap visualization or confusion matrix generation to reason about the current benchmark result. If the validation result do not match the premise (goals), start a new iteration with step 1.
4. API
This task is optional. You implement an inference API for demonstration purposes.
The problems
Using the prototyping workflow above, I describe the problems I faced the most in recent years.
Dataset reusability
Most machine learning or deep learning tutorials focus on how to create a model and train it with an existing dataset. That’s good if you develop or modify an existing model and want to compare your results with state of the arts (SOTA) results. But often you need to create a new dataset because existing datasets do not fit your needs. In my experience creating a dataset takes a lot more time than training the model itself and the resulting datasets are highly project-specific and hard to reuse. Three examples:
1. An image classification dataset with a label for each image can not be reused as a object detection or image segmentation dataset, there are no object annotations.
2. An object detection dataset for detecting cars on road can not be reused for detecting pedestrians, there exist no object annotations for pedestrians.
3. An object detection dataset can not be reused for image segmentation, the annotation shape do not fit.
Script reusability
To create a dataset, you can try to consolidate data from multiple existing datasets where you need to write conversion scripts between annotation formats. These scripts are often written quick and less generic, specific to the context of the project and project structure, because normaly you only convert once. This is correct until you are coming back to the same situation in another project. This also happens if you want to deploy an API for demonstration purposes. You often copy and paste an existing API script and rewrite the model inference, the pre- and post-process part as well as the UI template.
Third party repository integration
Research papers publish the source code often as a Git repository. The project structure of the source code differs and if you clone the repository and use them in your project, you are forced into that structure. There is additional time necessary to learn the structure and the workflow as well as write custom tools which also reduce code reusability.
The solution
The prototyping workflow is a loop and the tasks repeat with each iteration. Implement tools and libraries to automate and shorten the time for each iteration brings great benefit. To solve above problems, I do first a workflow refinement and create a project structure based on that. Tools and libraries are handled in part 2 of this blog series.
Workflow refinement
To increase dataset reusability the workflow changes as shown in the graphic below.
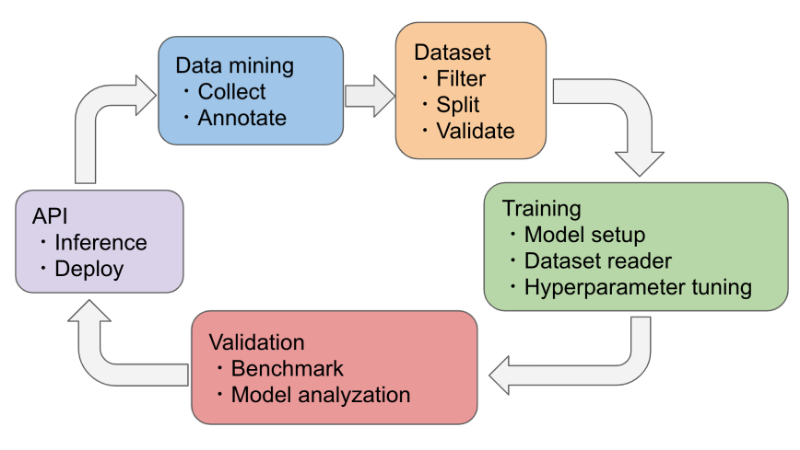
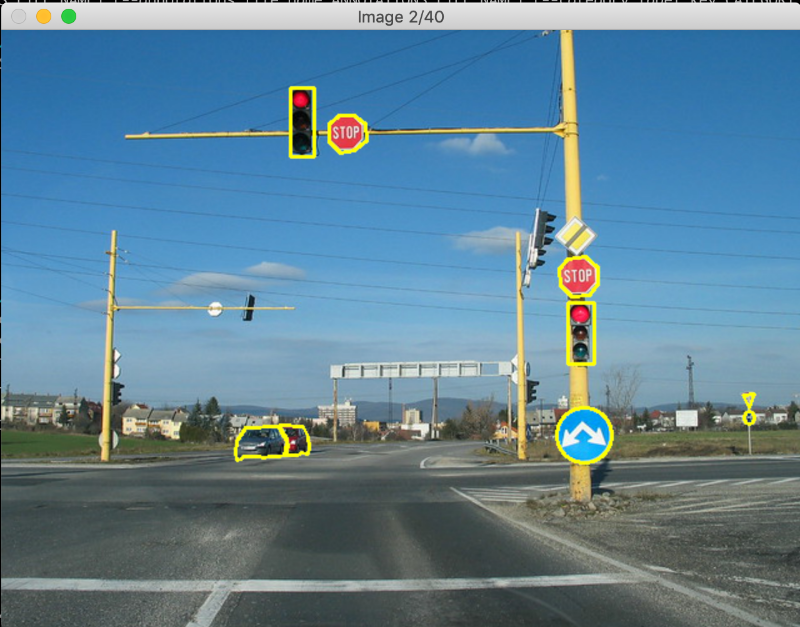
- 1. A data mining task is added. The goal of the data mining task is to create data collections with project-independent annotations. Because project context knowledge is not necessary, this task can be outsourced to a different team without background knowledge. The image below – taken from the COCO dataset – shows an example annotation. Street signs and cars are annotated to fit the shape as best as possible.
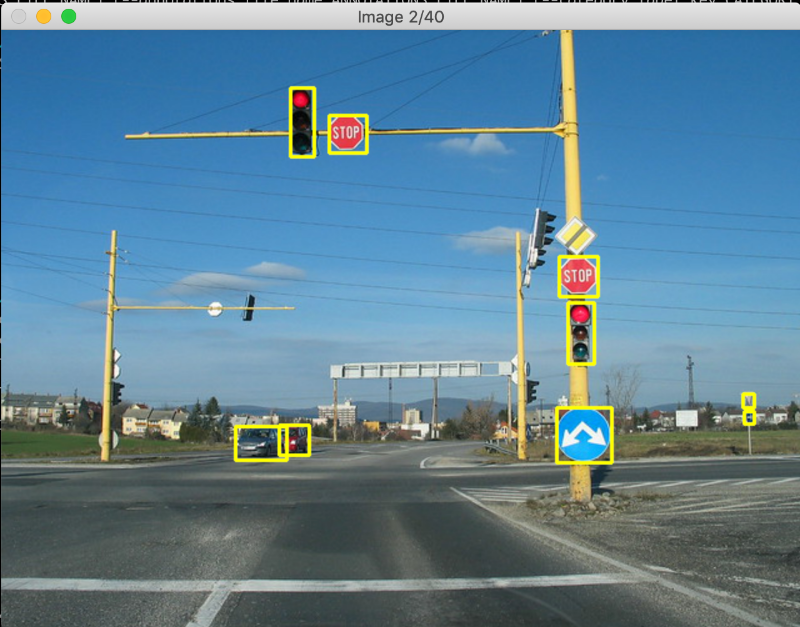
2. The dataset task creates a dataset out of a data collection by filter and convert only needed annotations. The data is then split into a training set, validation set and test set. This allows an easy integration and implementation of cross-validation as well. Below image shows the converted annotations in an object detection dataset.
The project structure
Below is the project folder structure created from above workflow refinement.
※Note: The data collection and dataset images are abbreviated.
workspace/
├── MyProject
│   ├── .gitignore
│   ├── datasets
│   │   └── street_views_objects
│   │       ├── build_2021.05.27-15.27.04.log
│   │       ├── categories.txt
│   │       ├── test
│   │       │   ├── 1343960723_453991a044_z.jpg
│   │       │   ├── ...
│   │       │   └── 536972399_0168b9ebec_z.jpg
│   │       ├── train
│   │       │   ├── 16417442_ead85468b4_z.jpg
│   │       │   ├── ...
│   │       │   └── 9276603906_014a6216b7_z.jpg
│   │       ├── val
│   │       │   ├── 2582184275_5ae1b927b9_z.jpg
│   │       │   ├── ...
│   │       │   └── 9065898919_89845cbf38_z.jpg
│   │       ├── via_region_data_train.json
│   │       └── via_region_data_val.json
│   └── modules
└── collections
    └── street_views
        ├── categories.txt
        ├── test
        │   ├── 1343960723_453991a044_z.jpg
        │   ├── ...
        │   └── 536972399_0168b9ebec_z.jpg
        ├── trainval
        │   ├── 16417442_ead85468b4_z.jpg
        │   ├── ...
        │   └── 9276603906_014a6216b7_z.jpg
        └── via_region_data.json
The workspace folder is defined here as the root folder for all projects. The collections folder contain all data collections. A data collection (street_view in this example) has a trainval folder for images used in training and a test folder for benchmark images. Beside the collections folder are the project folders (MyProject in this example). Because datasets are project-specific, they are stored in each project in a datasets folder. Inside a dataset folder (the street_views_objects object detection dataset in this example) are the folders train containing the training set, val the validation set and test the benchmark images. Finally the modules folder is the place to install third party repositories. The .gitignore file should ignore the datasets contents
Use git submodules to add third party git repositories
Research projects and sometimes APIs publish their source code in git repositories. Your project resides in his own repository which makes it difficult to manage multiple repositories. You should not put third party git repositories outside your project nor copy third party repository files and folders into your project as this blows your repository with contents you did not develop. Instead use the good old git submodules to add only a reference to your repository. Below are two examples to add research APIs residing in git repositories with results in the following folder structure in the modules folder (abbreviated).
│   └── modules
│       ├── detectron2
│       │   ├── GETTING_STARTED.md
│       │   ├── ...
│       │   └── tools
│       └── tensorflow
│           └── models
│               ├── AUTHORS
│               ├── ...
│               └── research
Example: Add Tensorflow Object Detection API
The Tensorflow Object Detection API installation steps explain two ways to install the API, with docker or pip. Both ways require to clone the repository to local first. Instead of cloning, we add a submodule to our project repository and store the API inside modules/tensorflow/models with the instruction below.
# inside your project folder
git submodule add https://github.com/tensorflow/models.git modules/tensorflow/models
# follow the instructions related to the submodule folder
cd modules/tensorflow/models/research
# Compile protos.
protoc object_detection/protos/*.proto --python_out=.
# Install TensorFlow Object Detection API.
cp object_detection/packages/tf2/setup.py .
python -m pip install .
# go back to the project folder
cd ../../../..
# commit the API reference to the project repository
git commit -m "installed Tensorflow Object Detection API"
The test application command below can be executed from the project folder either by use relative path or the (recommend) module path execution
# inside your project folder
# Test the installation. (relative path execution)
python modules/tensorflow/models/research/object_detection/builders/model_builder_tf2_test.py
# or Test the installation. (module path execution) (RECOMMEND)
python -m modules.tensorflow.models.research.object_detection.builders.model_builder_tf2_test
To update the API to the newest commit from the API repository, pull the master branch inside the API repository in modules/tensorflow/models.
# go to the API repository from inside your project folder
cd modules/tensorflow/models
# pull the newest commits from the API repository
git pull origin master
# rebuild the protos
cd research
protoc object_detection/protos/*.proto --python_out=.
# go back to the project folder
cd ../../../..
# commit updated reference
git add modules/tensorflow/models
git commit -m "updated Tensorflow Object Detection API"
Example: Add Detectron 2 API
The Detectron 2 API installation steps explain two ways to install the API
1. install the repository with pip
2. local clone the repository and do an editable pip install.
We will use the second way but instead of cloning, we add a submodule to our project repository and store the API in t modules/detectron2 with the instruction below.
# inside your project folder
git submodule add https://github.com/facebookresearch/detectron2.git modules/detectron2
# editable pip install to submodule
python -m pip install -e modules/detectron2
# commit the API reference to the project repository
git commit -m "installed Detectron 2 API"
To update the API to the newest commit from the API repository, pull the master branch inside the API repository in modules/detectron2.
# go to the API repository from inside your project folder
cd modules/detectron2
# pull the newest commits from the API repository
git pull origin master
# remove old build
rm -rf build/ **/*.so
# git back to the project folder
cd ../../..
# rebuild API
python -m pip install -e modules/detectron2
# commit updated reference
git add modules/tensorflow/models
git commit -m "updated Detectron 2 API"
The training step
Creating a sample dataset is recommend for faster development. This allows e.g. for validation or debugging that the model actually starts converging by using less images and shorter epochs.
The model checkpoints and weight files are recommend to save in the folder of the dataset used for training. This allows easy association between dataset, training and validation results and reduces management time if stored outside.
Recap
I explained a way to create a unified structure for machine learning projects. Third party repositories can be integrated into this structure by using git submodules. Having a unified project structure makes it easier to implement reusable generic scripts and to maintain projects.
A data collection with project-independent annotations allows data reusability. Datasets are project-specific and generated from data collections by filter necessary annotations and convert them to the format needed in the project.
Part 2 of this series explains the tooling based on this project structure to improve the iteration time.
Join us!


.jpg)